Solved Extruding A Roof With Different Slopes And Thickness In Both Directions Autodesk Community Revit Products

Solved Extruding A Roof With Different Slopes And Thickness In Both Directions Autodesk Community Revit Products

Using The Add Split Line Tool Revit Products Autodesk Knowledge Network

Using The Add Split Line Tool Revit Products Autodesk Knowledge Network

Solved Where Is The Add Split Line Command Autodesk Community Revit Products

Solved Where Is The Add Split Line Command Autodesk Community Revit Products

About Editing Floor And Roof Shape Revit Products 2019 Autodesk Knowledge Network

About Editing Floor And Roof Shape Revit Products 2019 Autodesk Knowledge Network

Cannot Create Parts For Roof In Revit Autodesk Community Revit Products

Cannot Create Parts For Roof In Revit Autodesk Community Revit Products

Revit 07 13 Add Split Line Youtube

Revit 07 13 Add Split Line Youtube

Revit 07 13 Add Split Line Youtube

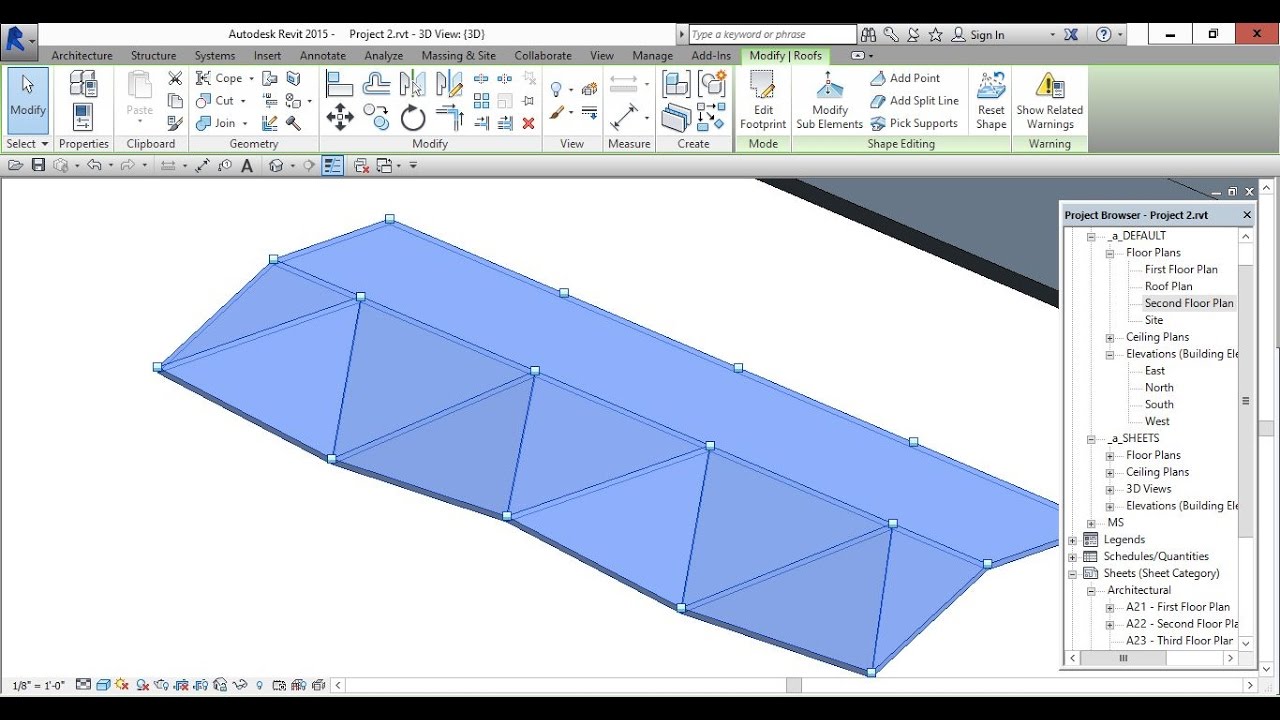
You can use the add split line tool to add linear edges and to split the existing face of a roof or structural floor into smaller sub regions.

Revit roof split line.

When you delete the shape edit element the floor adjusts its geometry accordingly. Select a vertex edge face or point anywhere on the structural floor to start the split line. This is pretty easy to control. Only one of the pieces is selected in the image below.

First i need to use split element to divide one eave line into 4 separate pieces. The simplest way to generate a slight drainage slope on a flat roof in revit is via the shape editing tool called modify sub elements. The forgotten options i had a client recently who does residential roof framing and wanted to know. This guide provides the answers to the most common roof problems beginners face with revit.

You can also watch the video tutorial below if you prefer. Click modify floors tabshape editing panelmodify sub elements. You can drag any point in your roof and adjust the roof shape. To delete shape edit elements select the modified floor.

Not all elements in revit can be split using these tools walls detail lines sketch lines and model lines are elements that are commonly split using these tools this tutorial is taken from the complete beginner s guide to revit architecture free online course. Or dormers along the eave line. Click modify floors tabshape editing paneladd split line. Select your flat roof.

Press delete or right click the element and select delete. Easier than the previous method. After you finish with the lines open default 3d view. Click on the shape edit element to select it.

Use the reset shape tool to go back to a completely flat roof. Add point or split line if better suited creates points at intersections place your new points as. You might prefer to use the add split line tool which create points at intersections. This shape editing tools will not appear if you define the roof slope.

Start points and endpoints can be added anywhere on the face of. First activate add split line and draw the lines like below. Press the modify sub elements button that appears. To use this do the following.

Can T Delete Added Points Split Lines In Floor Sub Element Autodesk Community Revit Products

Can T Delete Added Points Split Lines In Floor Sub Element Autodesk Community Revit Products

Roof Modelling In Revit Part 2 Youtube

Roof Modelling In Revit Part 2 Youtube

Solved Roof Doesn T Meet Autodesk Community Revit Products

Solved Roof Doesn T Meet Autodesk Community Revit Products

Split Roof In Revit Paul F Aubin

Split Roof In Revit Paul F Aubin

Source : pinterest.com